Saturday, February 28, 2009

A View from M-AQF

This little river went ALL the way to Virginia (for the Mid-Atlantic Quilt Festival). On Monday it begins its journey home. Have fun little quilt!!

Thank you, Lisa, for the pictures! I appreciate them!

And now we're off and running for a calf-branding party. Should be fun! Stay tuned for pictures later this weekend.

Oh, and here's a reminder. Today is the last day of February, so if you're Stepping along, you've got less than 24 hours to complete your February Step. I've heard from Kristin...has anyone else completed their Step? Don't forget to let me know, so I can put a remembrance in the mail for you...

Thursday, February 26, 2009

Something To Report

Best Handworkmanship, Mid-Atlantic Quilt Festival 2009
"Encompassing Tradition"
Suzanne Kistler, 2007

When I posted a picture of this little quilt a few weeks ago, it spurred a surprising number of comments. (More than one is surprising, in my book.) It was on its way to the Mid-Atlantic Quilt Festival. Well, the Festival opened today, and the winner's list has been posted. This little quilt was able to hold its own. Good for you, little quilt!!! I am SO thrilled.

I'm also kind of happy, in a bizarre way, that my other quilt did not place. That means that it should be home before I head out to Asilomar for a week with Cynthia Corbin. I started that quilt in her class, and I'm looking forward to showing her the finished product. Assuming, of course, that it gets back in time...

Finally, this ribbon was the encouragement I needed to get back to work on my hand-quilting. I seem to be in my prime. Either that, or my timing is impeccable. Today's blue ribbon for handworkmanship is my fourth from the Mancuso Brothers and my sixth since 2006. wow. I think I'm onto something here. (I've yet to catch the judges' eye with my machine quilted quilts, with the exception of "More Glorious Than Solomon," which is pictured in my header...)

So. The day is quickly passing, and I'd better get off the computer. If you happen to be in Virginia, why don't you stop by and say "Howdy!" to my quilts! :) Happy quilting!!

Wednesday, February 25, 2009

Not Much To Report

Things have been happening here, but nothing has been terribly noteworthy. Very little has been worth recording with the camera. But, I feel guilty about ignoring my friends in Blogland, so here's what's been happening.

On Monday, I basted a few quilts. This is what I usually expect: quiet, pieceful, undisturbed batting.


But the batting wasn't still and quiet. It was bumping and moving. What?!! Here is the cause. Charlie?! I didn't even know you were in the house!

I wasn't the only one who noticed the moving batting.

Charlie definitely had Malcolm's attention.

A quick game of footsy encouraged me to pick up the draped batting - I don't want cat hair in this project!! - so the guys moved down to the portion I missed.

This morning they were a bit more passive. But they still want to help. Thanks, Charlie! Can I have the mouse now? Please?

Hopefully I'll have more to post before the week ends. Happy quilting!!!

Monday, February 23, 2009

What's In A Name?

When I first began quilting, I began with two projects. No wait. It was three. I wanted to make a 25th anniversary quilt for my parents. A friend had made one for her parents, and she'd made applique blocks celebrating events of their life together, as well as various interests. I made an applique block of pots (my mom was an accomplished potter), and that's as far as I got.

I quickly shifted gears and started a white "whole cloth" kingsized quilt using the quilt-as-you-go method taught by Georgia Bonesteel. I began in early 1982, I finished in December 1984. (Their 25th anniversary was in June 1983.)

I started a Monkey Wrench quilt for my daughter. (Also begun in 1982, I finished this particular quilt in September 1985.)

In the beginning, I thought I was a quilter of very little dedication. Now, so many years later, I find that having multiple projects stashed around the house is normal for most quilters. I say most, because I do know a few (very few) who buy fabric for a particular project, and then proceed to finish it before beginning something else. That's just not my style. It never has been.

Anyhoo, When I first joined the guild in 1987, I was introduced to the concept of UFO's. That would be "UnFinished Objects" for those of you still out of the loop.

Last year, when I discovered quilt blogging, I learned a new term, "WIP's". For "Works In Progress." hmmm. WIPs works for the quilts that haven't yet made it to the back of the closet and forgotten, right? ;)

On Friday, I heard a new one. "UFO's? I don't have any UFO's! I have PhD's!!"

PhDs? What would that be?

"You know, PhD's..."Projects Half-Done."

Ahhh. Actually, PhD works for me too, but it doesn't stand for Projects Half-Done. A friend of mine (whose husband was in a PhD program) told me, "PhD REALLY stands for Piled Higher and Deeper." My unfinished projects, most certainly rate that particular description!!!

And the pile's not getting any smaller. But I have taken two small-to-you/large-to-me steps towards getting a couple of items out of that pile. Yay for the 12-Step Program!!

Time to go work on something else...I hope you get to work on a quilt today!

Saturday, February 21, 2009

The Missing Step

I didn't just whip these together. I'd already pieced the cards, I only had to select backings and finish them off. Here are the steps. I apologize for some of the blurry photographs. The camera just did NOT feel like focusing. And when it's not in the mood, there's not much I can do about it.

When I skipped out on you, I had the top trimmed and "square." The backing has been cut 5/8" larger all around. You are at the ironing board.

I fold the first side over the front and press, making the crease to the edge nice and crisp.

I fold the corner up 45 degrees, leaving a small space between the edge of the batting and the fold. I think my pressing instructions were pretty clear, I just wanted to share this nice crisp photo. (I'm not sure how I got it!)


When I begin sewing, I turn under the raw edge, leaving about a 1/4" "binding." I begin in the middle of a side, at least a few inches from the first corner.

As I approach the corner, I turn up the backing, along the crease.

Here is a second, better picture of approaching the corner.

Then I turn under the turnunder, and prepare to sew my way to the corner.

It's a tricky thing, and my finger is too fat to accomplish a smooth turn.

If you pull out the stiletto, the turn is much more manageable.

Here I've completed the first turn and am zooming along a straightaway.

I slow down as I approach the next corner.

I turn up the corner along the crease.

I check my angle, and turn under the raw edge.

I've already used the stiletto to turn the corner, making sure that I've picked up the next edge, and away I go, headed to the next corner.

Here I am, after rounding the last corner. As you can see, I've turned under the remaining raw edge and am headed back to where my stitching began.


Here is the finished card. Once I'd bound it, I decided that it needed to be quilted around the verse. Again, I've added my signature and the date in the lower left triangle. And now, it's ready to go.

I got the idea for these cards from a postcard my friend Sharon made for me. She makes her cards a bit stiffer, so they can go through the mail without an envelope. (I put mine in transparent envelopes.) As you can see, she's added lots of beadwork. She handed this to me in person, it did NOT go through the mail! (I apologize for the fuzzy photo. I blame the camera.)

Here are my final cards, all spruced up and ready to go.

Thanks for checking in, and I hope that you have fun creating a quilted card or two of your own!

Step by Step: A Quilted Notecard

hmmm. They only flipped 2 of 21 images. I guess that's a good thing. Now to put them in order and proceed with this post...

Over the past year, I've shown you a number of the quiltlets/cards that I've made for friends and family. This is a relatively easy process, that gets easier with practice. The first few cards took hours, now, depending upon what kinds of odds and ends I have handy, I can whip them out pretty quickly. The first thing I need is an idea. This can be knowing a person who needs a card, or celebrating an occasion that warrants acknowledgement or even just the opportunity to explore a possible new color scheme. I'm also big on using leftovers from finished quilts, to make cards.

Anyway, today's project is a thank you card for a gentleman who was a GREAT help to me on Thursday. He seems to have a fondness for quiltie ladies, so that tells me that he might appreciate his own little quilted thank you note.

I had this mini purple star on my design wall. It was made from pieces of something or other, I don't remember what. But I've had it on the wall, thinking that the center would be perfect for a quilted message: all I needed was a message.

To begin with, I position the block on a 5" x 7" piece of cotton batting.


Then, I find a scrap that will help to fill in the blanks, and begin sewing, using my walking foot.

I press the added piece open, and make sure that the batting is covered.

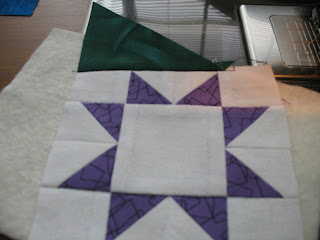
In this picture I've already added the second piece (the blues) and am adding the third (the yellow).

As you can see, the batting is disappearing. If I need to use some of the fabrics that are overhanging the batting to cover this particular card, I will trim early. But for the sake of demonstration, I will leave everything extended, so that you can see each step of the process.

Here I am getting ready to sew on the last piece. Notice that it is positioned near the top of the batting, not lined up with the excess yellow fabric. My goal at this point is to cover the batting, and that's it.

If I'm adding a pieced strip, it really helps to use some sort of stiletto to keep the seams down in the manner in which they've been pressed.

When all of the batting has been covered, this is what it looks like: (And if you're wondering what the "null" symbol is on my cutting mat, that is my note to myself that this cutting mat has been used to cut flannel and batting. It is NOT good for cutting regular fabric. I use it solely for cutting flannels and batting.)

When I flip the card over, this is what it looks like.

Time to trim it down to the batting. It is absolutely KEY to make sure that the corners are cut 90 degrees. If that means trimming down the batting, fine. Trim it down. If the corners are not sharp and 90 degrees at this point, they never will be.


This is what it looks like, once it's been trimmed.


And here's the top.


I pick a backing piece and lay the quiltlet on top.


I trim the backing to 5/8", all the way around.

Then it's time to press. This step is also critical. I press down one side, making sure that the crease in the extension is nice and crisp.


Then, using the stiletto, I turn the corner up to a 45 degree angle. I LEAVE A GAP (about the size of the stiletto's tip) between the batting and the corner of the angle. This gives the backing some ease, as I pull it to the front and press again.

See how I have this nice sharp angle?

Oh, phooey.

I took all of these pictures, and I just now realized that I didn't take any of sewing down the backing. I'll have to come back and do that in a second post, on another card. For now, I'll tell you that I turn under the raw edge so that the self-binding measures about 1/4". The corners are tricky, and the stiletto is once again instrumental in helping me turn them.

Once the back is sewn to the front, it looks like this:


At this point I add my free-motion message:


The final message is a bit shakier than I like, but there are seam allowances under the words, and there's not much I can do about it at this point. I also noticed that the star seems "poofy," so I pulled out my walking foot and quilted around the star points.


Of course my final picture is tipped. I am grateful that the important step by step pictures are not.

Be sure to sign your name to your work of art, and date it. I usually do that in a matching color (I've signed this one on the bottom green triangle) because I don't want my signature to distract from the body of the card. But it is a handmade gift, and hopefully the recipient likes to remember who it came from...

And that's all folks...until I add the back to another card, and try to take pictures of myself sewing. (Some of these pictures were snapped one-handed with my left hand, so if they're fuzzy, well, they're fuzzy!!)

Thursday, February 19, 2009

Busy As A Bee

Wow. All my plans to sew today disappeared with the sunrise. It was all about the quilt show, all day long. I reserved the hotel for our judges, tracked down some missing signage, reviewed the vendor floor plan, took a peek at the entries received so far, and came home and washed the signs. whew!

I also went to the car wash after unloading the signs, because they came with a carload of spiders (and a few yellow jackets) in addition to dirt. Needless to say, I'm tired. I might just have to do some hand-quilting tonight. I don't have enough get up and go to get up and do much else. It's a good tired.

Getting these tasks done today means that I won't have to do them tomorrow. Tomorrow had already been tagged as a "quilt show all day" day. I've got a list of paperwork that needs to be put together, and tomorrow is as good a time as any. Never a dull moment.

How is it that people get bored? I have no idea...

By the by...my husband came home as I was washing the last sign. He had a brain storm. He wants to hire someone to pressure wash the driveway and the patio next week. umm. really? Because I just filled the patio with quilt show sandwich boards...

His eyes got big and he asked if I want to rent mini-storage. umm. No. I need to go through this stuff and it's easier to have it all right here where I can see it.

And the signs need to be repainted, with the new location and the correct date...

Sorry dear, the show ends April 19. We can talk about it on April 20.

Wednesday, February 18, 2009

This n That

On my way home from Lindsay, I stopped at a little antique shop. I have a thing for chairs. (And glass. And crystal. And porcelain.)

Anyway, I saw this cute little rocking chair for $20 and had to bring it home with me. It has a flaw - some of the bird's eye maple veneer is peeling at the top - but I can overlook it. The shape of the chair called out to me, and the rest is history.

We had a surprise visitor over the weekend. He left yesterday, after stretching his 3-day weekend to four. (He doesn't have class on Tuesday.) Here's Adam...and Charlie...

I finished my freezer paper pattern, so I can officially declare my February step to be complete. I've only drawn 1/4 of the window. I plan to reuse each piece 4 times. I hope it holds up!!!

I thought you might find it interesting to get some perspective on just how big this pattern is. See how it dwarfs my machine? yeah. It's a big ole thing...


Finally, the 2009 Hoffman Challenge fabric arrived yesterday. I bought 2 yards. All I can say is bleah. It doesn't improve in person. I guess it has some metallic on it, but I can't decide if it's gold or silver or both. For some reason it looks maroon in the photo, but it's more a chocolate brown. To me, it's a groaner. Let's see if I can get any sort of inspiration in the next couple of months. So far it's not looking good...

And that's it for now. Hopefully I will have more to report in the morning...