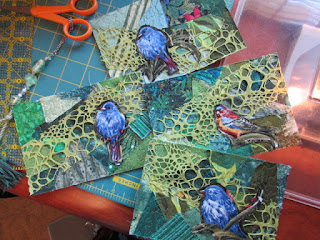
I frequently have people ask, "How did you do that?" regarding one project or another. Today, I sat down to make a batch of Spring-themed postcards. I thought it might be prudent to photo-document the process, just in case someone wants to know "how I did that."
I started with my postcard-making box. Here are the photos AFTER I have pored through and straightened the contents. I cut the fusible peltex into 4x6" "blanks," almost as soon as I buy it. This saves time when I'm ready to sit down and make postcards. To the side are some 4x6" pieces of batting, and muslin, in case I want to do crazy quilting or poofy quilting on the postcard.
I sorted my scraps into colors. I forgot to take this picture right after sorting, so I've already taken out the larger chunks of green.
The first thing I did was to fuse the scraps onto one side of the peltex.
Next, I stippled them in place, using green thread on top, and white thread in the bobbin.
Once the base is secure, I'm ready to start playing.
I bought this stiff green "lace" at a quilt show last year. I thought it would add interest to the card, so I stitched around the edges, again with green on top, and white in the bobbin.
Next, I fussy cut some birds, from a fabric purchased with this task in mind.
When the bird was where I wanted it, I raw-edge stitched it in place, then repeated the same on the other cards.
At this point, the tops look finished to me. I can't think of anything else to add, so I cut backs, again 4x6". It is best to use a very light-colored, barely printed fabric, so that the address will show up when you write it on. Or, you can use address labels. I happen to think handwriting is a bit more personal.
The bottom card shows the back fused in place.
The last step is to finish the edges. I chose a green yarn, and a variegated green Valdani thread for the task.
Laying the yarn alongside the postcard, and using a walking foot, I zigzagged the edge of the card, being careful to catch the yarn in the stitch. A stiletto is useful to guide the yarn as close to the edge as possible.
I zigzag the edges a second time, using a slightly wider and slightly shorter stitch. At the corners, I stitch to the edge, then backstitch 2-3 stitches, pivot, stitch forward, backstitch, then stitch forward to the next corner. I like the smooth turn that backstitching gives to the corner.
When I am finished, this is what the back looks like. It can be addressed like any other postcard, though it takes about 71 cents to mail it. (That's a forever stamp, plus the "special handling" fee.) The price has increased since I last mailed a postcard, so I'm a bit fuzzy on the cost.
Finally, this is what my finished "Spring" cards look like.
Why did I make these cards? Oh! They are for a postcard exchange with Postmark'd Art. I have until August 31 to complete the trades that I signed up for. One down, two to go.
Happy stitching!
Friday, June 19, 2015
Subscribe to:
Post Comments (Atom)


3 comments:
I loves these cards! I need to make some more postcards this week. Thanks for the inspiration!
Thanks. You make it look so easy.
Thanks for the "tutorial". It makes me want to make some cards to send.
Post a Comment